A sudden blast of scalding hot or freezing cold water in the shower can be more than just uncomfortable—it can be dangerous. That’s why modern bathrooms often come equipped with an anti scald valve, also known as a scald guard shower valve. These valves regulate water pressure and temperature, keeping your shower safe and consistent. You May Also Like: Dishwasher Drain Hose.
In this guide, you’ll learn everything about anti scald valve showers—how they work, signs of failure, troubleshooting, and repair tips.
👉 Need professional shower valve repair or installation? Visit Plumber Near Me for expert plumbing solutions.
What Is an Anti Scald Valve?
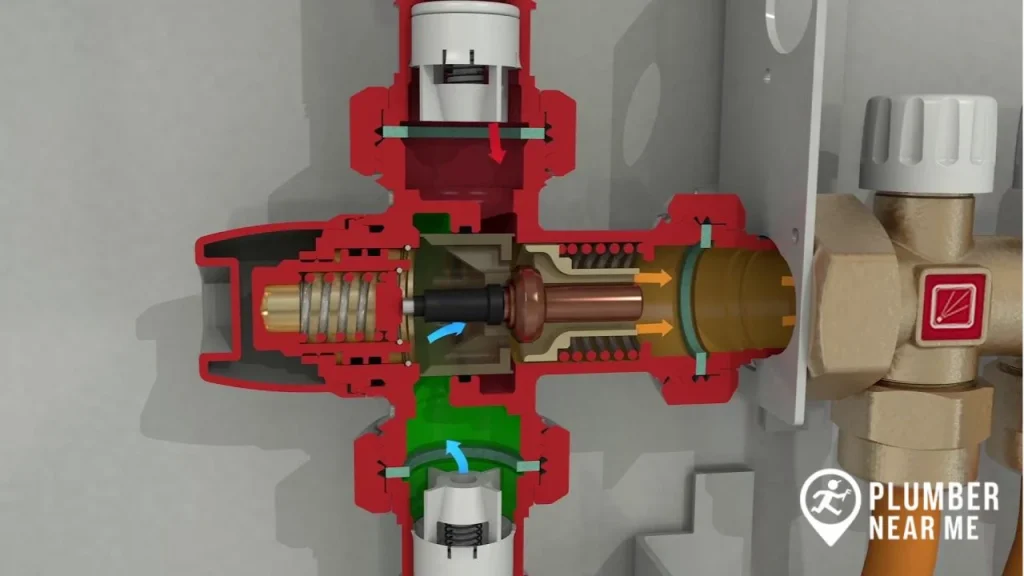
An anti scald valve is a safety device installed inside your shower valve system. Its main purpose is to balance hot and cold water pressure so you don’t experience sudden bursts of extremely hot or icy water.
For example, if someone flushes a toilet while you’re showering, the cold-water pressure may drop. Without a scald guard, this could send a surge of hot water to the shower. An anti scald valve prevents this by automatically adjusting the flow from both water lines.
Signs of Anti-Scald Shower Valve Problems
Just like any plumbing component, an anti scald valve shower can wear out or fail over time. Here are the most common symptoms:
- Sudden water temperature changes when using the shower
- Thumping or knocking sounds when turning the water on
- Inconsistent hot water supply
- Difficulty adjusting shower temperature
- Reduced water pressure
- Hot water leaking into the cold line (cross-connection issue)
If you notice any of these, it may be time to repair or replace your valve.
Tools & Materials for Repair
Before starting repairs, you’ll need some basic plumbing tools:
- Adjustable wrench
- Screwdriver
- Needle-nose pliers
- Plumber’s grease
- Replacement cartridge or anti scald valve part
- Towels or rags
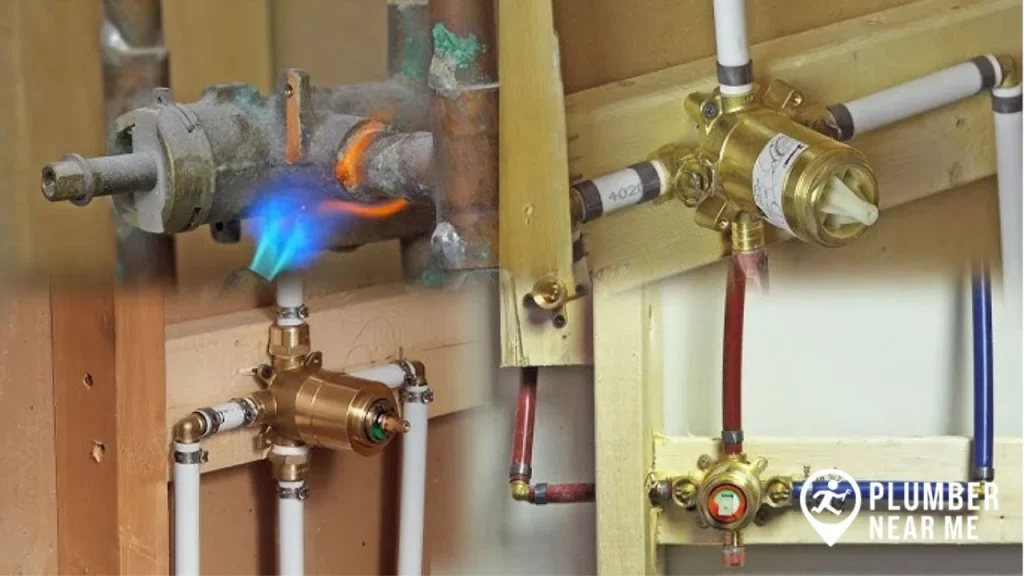
Step-by-Step: How to Repair an Anti Scald Valve
1. Shut Off Water Supply
Turn off the main water supply or the supply line to the bathroom.
2. Remove Shower Handle & Trim
Unscrew the handle and trim plate to expose the valve body.
3. Take Out the Cartridge
Use pliers to carefully pull the cartridge from the valve. This may include a secondary pressure-balancing cartridge depending on the model.
4. Inspect the Pressure Balancer
Check for a worn or damaged diaphragm inside the valve. This is often the cause of anti-scald shower valve problems.
5. Replace Damaged Parts
If the diaphragm or cartridge looks faulty, install a new replacement that matches your shower’s make and model.
6. Reassemble the Valve
Apply plumber’s grease to O-rings, reinstall the cartridge, and reattach the handle and trim.
7. Test the Shower
Turn the water supply back on and run the shower. Check for smooth operation, consistent water temperature, and no leaks.
Troubleshooting Anti-Scald Shower Valve Problems
Even after repair, you may face issues. Here’s how to troubleshoot:
- Temperature still fluctuates: Ensure you used the correct replacement cartridge and installed it properly.
- Water pressure too low: Check your home’s water pressure—it may not be related to the valve.
- Leaks from the valve: Reapply plumber’s grease or tighten connections.
- Hot water entering cold line: Replace the entire pressure balancer unit.
When to Call a Professional
While some DIY homeowners can replace or repair an anti scald valve, you should call a plumber if:
- The valve is part of an older or complex shower system
- You’re not sure which replacement part to buy
- Repairs don’t solve the problem
- You notice corrosion or major damage inside the valve
Maintenance Tips for Anti Scald Valves
- Clean your shower head regularly to prevent sediment buildup.
- Avoid harsh chemical cleaners that corrode valve components.
- Test the shower temperature occasionally to ensure consistency.
- Have a plumber inspect your shower system every 1–2 years.
FAQs About Anti Scald Valves
What is an anti scald valve in a shower?
It’s a device that prevents sudden water temperature changes by balancing hot and cold water pressure.
How do I know if my anti scald valve is bad?
Signs include inconsistent water temperature, difficulty adjusting the handle, low pressure, or hot water leaking into the cold line.
Can I repair an anti scald shower valve myself?
Yes, if you’re comfortable with basic plumbing. Most repairs involve replacing the cartridge or pressure balancer.
How much does it cost to replace an anti scald valve?
DIY replacement parts cost $30–$70. Professional repair may cost $150–$300 depending on your plumbing setup.
Is an anti scald valve required by code?
Yes. Most modern building codes require scald guard shower valves for safety.
Conclusion
A reliable anti scald valve is essential for a safe and comfortable shower experience. Whether you’re facing anti-scald shower valve problems like temperature swings or leaks, timely repair or replacement ensures long-term safety and comfort.
👉 For quick, professional valve repair and installation, visit Plumber Near Me.